
Creating a New Learning Group.
In ACTIVATE, we refer to classrooms as “Learning Groups.”
The Learning Group contains two types of cognitive workout schedules: a 20 minute and a 30-minute schedule.
To Create a Learning Group follow these steps.
- Click the icon labeled “Add Learning Groups.”
- Name the Learning Group (typically with the last name of the teacher).
- Select a Training Schedule– 20 or 30-minute workout.
- Select a school– if there are no schools added to the account, you can leave it blank.
- Select (or create) a Group Circle – circles are just a way of organizing your learning groups.
- Select the last training date – Select a date that will indicate to the system when the last time the students will be logging on. Usually a week or 2 before the last day of school. The system will calculate how many sessions will be needed in order to reach the 1,000 minutes that’s usually necessary to unlock the Cumulative Cognitive Report.
- Click Save
Adding Students: Students can be added separately or uploaded with a spreadsheet.
- Click the icon labeled Add Students.
- Select whether you want to create a single student or upload a spreadsheet of multiple students:

Create A Single Student:
- Click on Create Student . Fill out the required fields.
- Username– must be unique. Follow a naming convention to keep things easy to remember.
- Password– All passwords are case sensitive and one password can be used for everyone.
- Status–
- Active is selected for students currently using the system.
- Archived students who are no longer using the system, but show up on reports.
- Hidden are students who are no longer using the system and do not show up on reports.
- Learning Group- make sure the student being registered is associated with the correct Learning Group. Students can be changed from one Learning Group to another without losing any data.
- Save– be sure to save any changes.
Import Multiples Students from a Spreadsheet:
- Click on “Import Students” at the bottom of the page.
- On this page, you can upload a CSV file (easily created in Excel) with information for multiple students. Just make sure your columns match the instructions listed on the page – and do not include column headings in your CSV. Here is a template CSV file that shows you how to set up the spreadsheet. Just be sure to save it as a CSV file before uploading.
- Once you have your file ready to upload, click the Browse button, select the spreadsheet from your computer’s files, and click Open, then Import.
The Deduplicator: Working with Students Already in the System
When a previously-registered student is moved to a new Learning Group, their data from their previous Learning Group is still saved – but they begin the program anew with the rest of the new Learning Group. C8 Sciences recommends students begin the program from level 1 at the beginning of each new year.
There are two ways you can reassign students from old Learning Groups into new Learning Groups for the new year:
- For individual students:
- Click the Edit icon next to the student name.
- Change the Learning Group of the student to the new Learning Group.
- Click Save.
- For multiple students:
- Use the Import Students tool as described above to set up your new Learning Groups. You can upload a Learning Group that has a mix of old and new students, or even all old students.
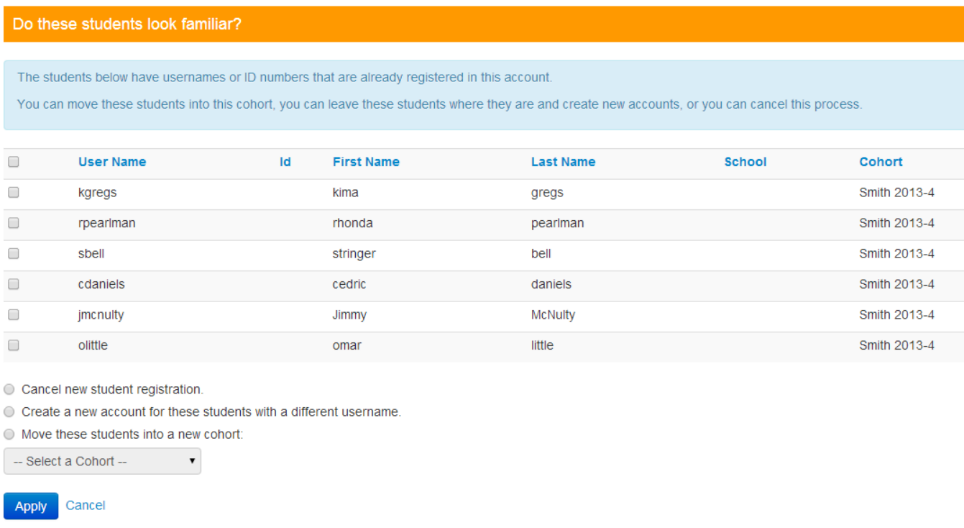
- The School Portal will automatically find any newly-registered students from your CSV file that are already in the system and display a list of these duplicate students. If a student appears on this page, it means they’ve already been registered in ACTIVATE.
- By following the onscreen directions, you have three options for resolving duplicate registrations:
- You can move the old student into the new Learning Group.
- You can leave the old student in their old Learning Group, and create a new username for the new student to use in the new Learning Group (it will not be connected to the other student account in any way). NOTE: If you choose this option, the new username will simply have an “_1” added to the end of the username that was entered in the CSV file. You can easily print out a list of all student passwords by clicking the Student Accounts link on the Learning Group overview page.
- You can quit the process and the new students will not be created, the old students will remain where they were.
Click “Apply” to save your changes. You will not be able to add new students to a Learning Group until all duplicate registrations are resolved.
Note: “cohorts” are now referred to as “learning groups”.